- Version: 1.0.0
- GitHub: https://github.com/EddyVerbruggen/nativescript-homekit
- NPM: https://www.npmjs.com/package/nativescript-homekit
- Downloads:
- Last Day: 0
- Last Week: 0
- Last Month: 0
NativeScript HomeKit plugin
Installation
From the command prompt go to your app's root folder and execute:
tns plugin add nativescript-homekitDemo app
Recommended! Check out the demo to get a feel of what you can do with HomeKit.
You can run the demo app from the root of the project by typing npm run demo.ios.
A bit of context
As mentioned here, HomeKit is a framework for communicating with and controlling connected home automation accessories that support Apple's HomeKit Accessory Protocol. HomeKit apps enable users to discover compatible accessories and configure them. Users can also create actions to control accessories (such as a thermostat or light), group them together, and trigger them by using Siri.
HomeKit objects are stored in a database residing on the user’s iOS device, which is synchronized over iCloud to other iOS devices. HomeKit supports remote access to accessories, multiple user devices, and multiple users. HomeKit also handles security and privacy for you.
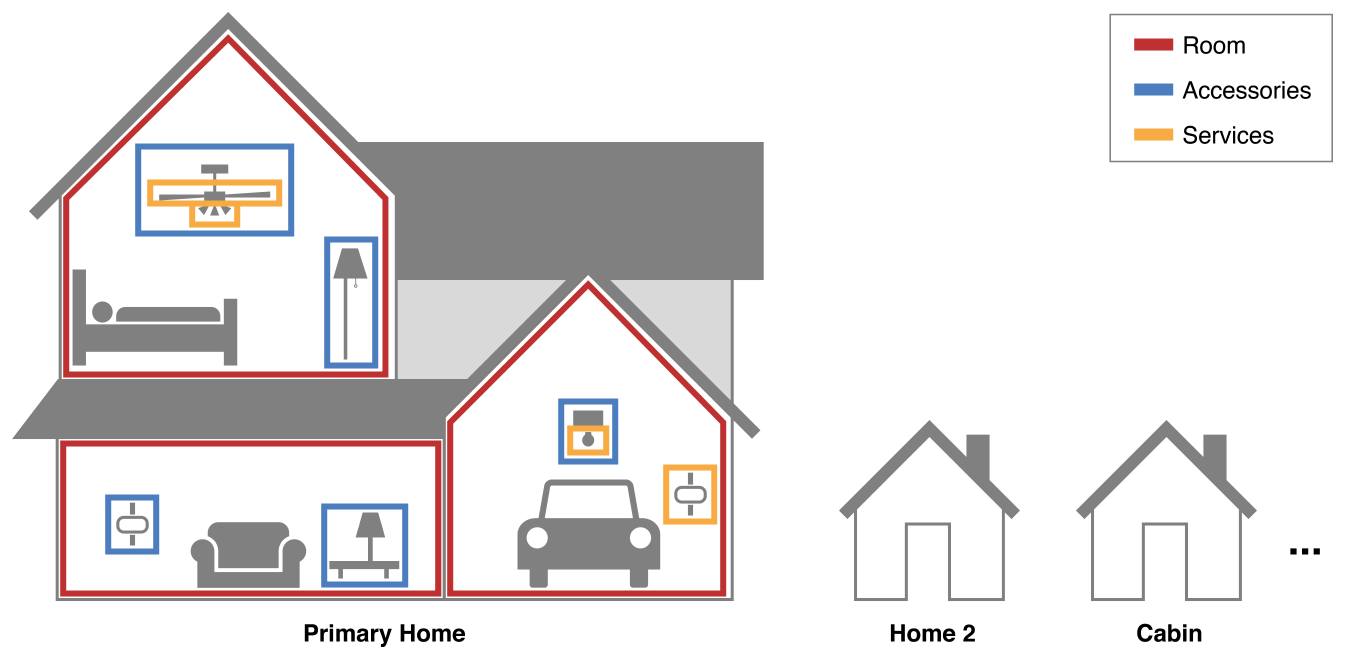
Homes
At the top of the hierarchy are 'homes', think your family home, and a (permanent) vacation home. Each home can have multiple rooms. Accessories in a home may be assigned to a room. And finally accessories have services:
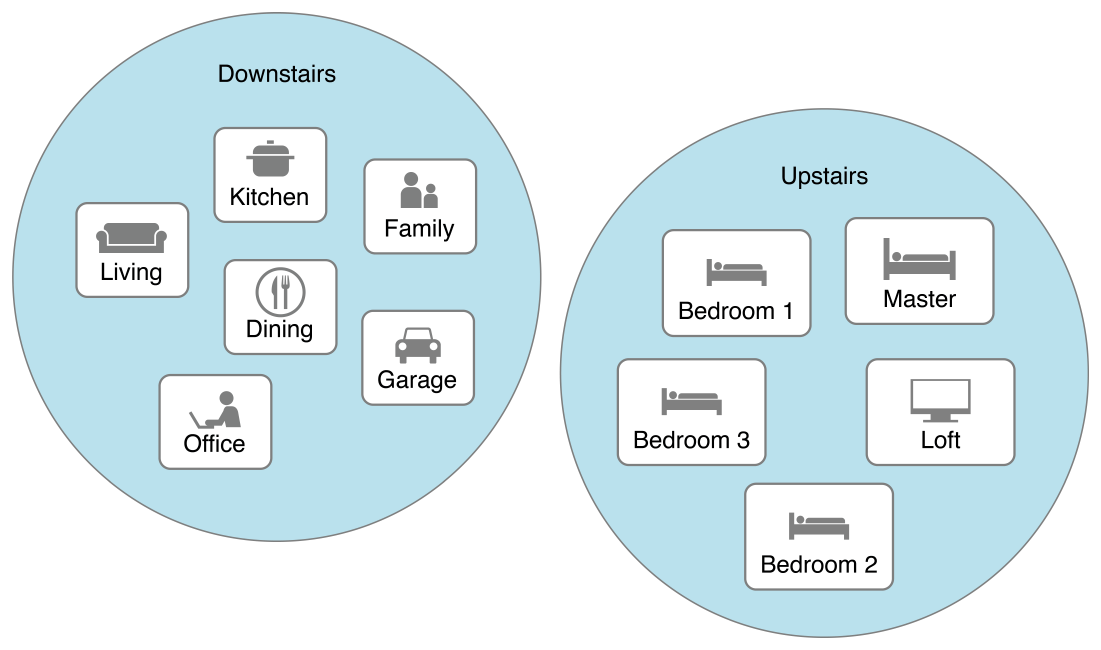
Zones
To further structure your HomeKit layout and create powerful scenes HomeKit has the ability to divide your home into zones (the 'Kitchen' and 'Garage' rooms could be clustered in a 'Downstairs' zone):
What this plugin does
This plugin gives you a dead-simple interface into HomeKit's SDK to manage homes, rooms, and zones, and assign accessories to those homes or rooms.
Anything beyond that can be done as well, but you'll need to interact directly with the HomeKit SDK. Don't worry, we'll explain how that works and it's easier than you might think.
You may wonder why this plugin doesn't expose the entirety of HomeKit? Mainly because it's huge and everything beyond the parts exposed by this plugin really depends on the type(s) of accessories you own. So that would mean we'd produce a lot of untested wrapping code while using the raw SDK isn't that different anyway.
Setup
Open your project in Xcode, go to Targets, then enable HomeKit. This needs to be done only once, unless you run tns platforms remove ios & tns platform add ios of course.
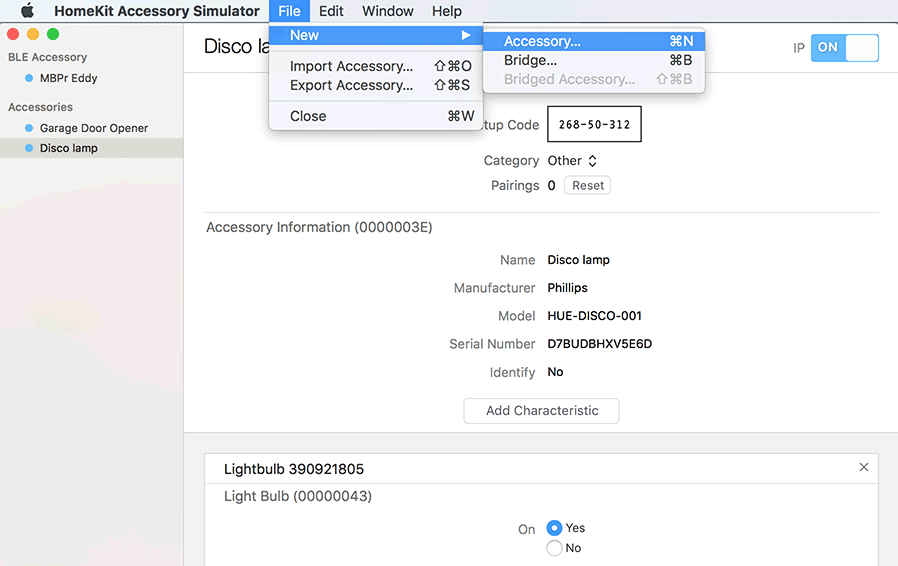
Download the HomeKit Simulator which is now part of the Hardware IO Tools. It's a super convenient way to test your HomeKit-powered app.
Just open the simulator and add a new accessory as shown in this picture and you're ready to play with it in the demo app:
Types
The HomeKit plugin wraps the native iOS HomeKit SDK classes to make it more convenient for you to work with them. The API functions further below use the types listed in this section.
Note that you can skip this section and just look at the TypeeScript .ts.d files shipped with this plugin. If you use a decent IDE like VSCode or Webstorm/Intellij you will get autocomplete, etc based on those definitions.
Home
| Property | Type | Description |
--- | --- | --- | ---
| name | string | This is used by Siri so it is unique |
| primary | boolean | The first home you create will be the 'primary' home |
| zones | Array<Zone> | All zones you've created in this home |
| rooms | Array<Room> | All rooms you've created in this home |
| accessories | Array<Accessory> | All accessories you've assigned to this home |
| ios | HMHome | The native HomeKit SDK class you can further explore |
Zone
| Property | Type | Description |
--- | --- | --- | ---
| name | string | This is used by Siri so it is unique for the home |
| rooms | Array<Room> | A zone can have mulriple rooms, each with a unique name |
| ios | HMZone | The native HomeKit SDK class you can further explore |
Room
| Property | Type | Description |
--- | --- | --- | ---
| name | string | This is used by Siri so it is unique for the home |
| accessories | Array<Accessory> | A room can have mulriple accessories assigned to it |
| ios | HMRoom | The native HomeKit SDK class you can further explore |
Accessory
| Property | Type | Description |
--- | --- | --- | ---
| name | string | This is used by Siri so it is unique for the home |
| bridged | boolean | Whether or not this accessory is connected through a bridge (which is an accessory like everything else) |
| room? | Room | The accessory may or may not be assigned to a room |
| ios | HMAccessory | The native HomeKit SDK class you can further explore |
API
Most of the examples will be in TypeScript as I think that's by far the best way to build anything with JavaScript these days. If you plan on doing some deep interaction with HomeKit's accessories and services you'll also want to install the tns-platform-declarations modules which provide TypeScript declarations of the HomeKit SDK.
Sounds a bit overwhelming? Just look at the demo app as it has all those bits configured. It's a non-Angular TypeScript-powered NativeScript app you can copy snippets from.
Note that all of these API functions use Promises so their .then() will receive a resolve and reject param. The reject will always contain a string with an error reason. Most of the time those error will originate from HomeKit itself. For instance if you add a room with the same name as an existing room to a home. Or if you end a roomname with a character Siri doesn't like.
For brevity I'll omit those rejects from most of the examples.
available
On iOS this will always return true, on Android false. So if you already have some other convenient means to branch your code between those two then don't bother invoking this method at all.
JavaScript
// require the plugin
var HomeKit = require("nativescript-homekit").HomeKit;

// instantiate the plugin
var homeKit = new HomeKit();

homeKit.available().then(
  function(available) {
    console.log(available ? "YES!" : "NO");
  }
);
TypeScript
// require the plugin
import { HomeKit } from "nativescript-homekit";

// instantiate the plugin (assuming the code below is inside a Class)
private homeKit = new HomeKit();

public checkAvailability(): void {
  this.homeKit.available().then(
    avail => console.log(available ? "YES!" : "NO"),
    err => console.log(err)
  );
}
init
No init, no glory - ehh, HomeKit interaction. You'll need to pass in a function that will receive updates when anything in the HomeKit database changes so your app can respond to those changes.
this.homeKit.init((homes: Array<Home>) => {
  // do anything with the Homes you received (look at the demo app!)
});
startSearchingForAccessories
Accessories may pop up at any time, but by default your app isn't searching for them all the time. It's probably a good idea to add a button to your app's UI that starts and stops searching for accessories as the user will know best when a new accessory can be found.
Only new accessories can be found, not ones already assigned to a home or room. Also, when accessories were previously stored in the local HomeKit database and have now been removed (try it, delete one in the HomeKit Simulator) then you'll be notified as well.
To that end you can pass in 2 distinct callback functions: the first is for newly discovered the devices, the second for removed devices:
this.homekit.startSearchingForAccessories(
    (accessory: Accessory) => {
      console.log("New accessory found: " + accessory.name);
      // you can use this to further interact with the accessory:
      console.log("Accessory native object: " + accessory.ios);
    },
    (accessory: Accessory) => {
      console.log("Accessory removed: " + accessory.name);
    }).then(
        () => console.log("searching.."),
        (err) => alert(err)
);
stopSearchingForAccessories
I'm not sure how much of a battery drainer search for accessories is, but it's probably a good idea to allow the user to be able to stop searching for accessories.
And it's easily implemented as well, so go for it!
this.homekit.stopSearchingForAccessories().then(() => console.log("Searching stopped"));Managing homes: addHome, removeHome, renameHome
You can offer the user to configure his homes, zones, and rooms (like the demo app does). Here's how you manage the homes:
addHome
import { prompt, PromptResult } from "ui/dialogs";

// ask the user for a name and add it to HomeKit
prompt("Name the home").then((promptResult: PromptResult) => {
  if (promptResult.result) {
    that.homekit.addHome(promptResult.text).then((home: Home) => {
      console.log(JSON.stringify(home));
      that.homes.push(home);
    }, err => alert(err));
  }
});
deleteHome
this.homekit.removeHome(name).then((home: Home) => {
  // the returned home is the one deleted
}, err => alert(err));
renameHome
// ask the user for a new name, prefill the old one
prompt(`Rename home '${currentName}' to..`, currentName).then((promptResult: PromptResult) => {
  if (promptResult.result) {
    // since the name is unique we're using 'currentName' as an identifier
    that.homekit.renameHome(currentName, promptResult.text).then((home: Home) => {
      // the returned home is already updated with the new name
      console.log(`Renamed ${currentName} to ${home.name}`);
    }, err => alert(err));
  }
});
Managing zones: addZone, removeZone, renameZone
Much the same as homes, so to not bore you we're just showing the TypeScript defintion here:
addZone(name: string, toHome: string): Promise<Zone>;

removeZone(name: string, fromHome: string): Promise<Zone>;

renameZone(oldName: string, newName: string, inHome: string): Promise<Zone>;
Managing rooms: addRoomToHome, addRoomToZone, removeRoomFromZone, removeRoomFromHome, renameRoom
Again, quite similar to the others. The only difference is you can only add a room to a zone if it's already added to a home. Which makes sense, right? Right. So that's why you also need to pass the home name when manipulating rooms in a zone.
addRoomToHome(name: string, toHome: string): Promise<Room>;

addRoomToZone(name: string, toZone: string, inHome: string): Promise<Zone>;

removeRoomFromZone(name: string, fromZone: string, inHome: string): Promise<Zone>;

removeRoomFromHome(name: string, fromHome: string): Promise<Room>;

renameRoom(oldName: string, newName: string, inHome: string): Promise<Room>;
Managing accessories: addAccessoryToHome, removeAccessoryFromHome, assignAccessoryToRoom, renameAccessory
This should look familiar by now. A few things to note though:
- Zones can't have accessories assigned, they're only for grouping rooms together.
- You first need to assign an accessory to a home before you can assign it to a room. That's why you need to pass the home name to
assignAccessoryToRoom. - An accessory can be assigned to at most one home (and one room) at a time.
- If you want to assign an accessory to a different room just use
assignAccessoryToRoom.
addAccessoryToHome(accessoryName: string, toHome: string): Promise<Home>;

removeAccessoryFromHome(accessoryName: string, fromHome: string): Promise<Home>;

assignAccessoryToRoom(accessoryName: string, roomName: string, homeName: string): Promise<Array<Room>>;

renameAccessory(oldName: string, newName: string): Promise<Accessory>;